


Imagine a cake that marries rich chocolate with velvety vanilla in a hypnotic dance of flavor and color-now imagine it without a trace of gluten. Welcome to the world of marble cake reborn: a swirl of delight designed for everyone to savor. In this ultimate gluten-free marble cake guide, we’ll unravel the art and science behind creating the perfect tender crumb and striking marbled patterns, all while keeping it safe and scrumptious for those with gluten sensitivities.Whether you’re a seasoned baker or a curious kitchen adventurer, prepare to dive whisk-frist into a realm where taste and texture swirl together in flawless harmony.
Understanding the Art of Gluten-Free Marble Cake Texture and Flavor Balance
Swirl into Delight: The Ultimate Gluten-Free Marble Cake Guide invites you to explore the magic behind creating a perfectly balanced gluten-free marble cake that sings with moist, fluffy texture and harmonious flavor.Mastering this bake means marrying carefully chosen gluten-free flours with natural flavor enhancers and a skillful swirl technique that yields stunning visual appeal and even baking throughout. Whether you’re a seasoned baker or a passionate beginner, this guide transforms the challenge of gluten-free baking into an exciting culinary adventure.
Choosing the Perfect Gluten-free Flours for a Moist and Fluffy bake
Achieving a tender crumb in gluten-free cakes hinges on the flour blend you select. A well-balanced mix of lighter flours like sorghum or millet, combined with the moisture retention of tapioca starch or potato starch, can replicate the elasticity and fluffiness of wheat-based batters. Adding a touch of almond flour not only enriches the moisture but also brings a subtle nuttiness that elevates the cake’s flavor profile without overpowering it.
Experimenting with these flours in the right proportions helps create a crumb that’s soft and airy, rather then dense or gritty. Many gluten-free bakers incorporate a small amount of xanthan gum or psyllium husk powder as a binder, which provides structure while keeping each bite delightfully delicate.
Mastering the Swirl Technique for Stunning Visuals and Even Baking
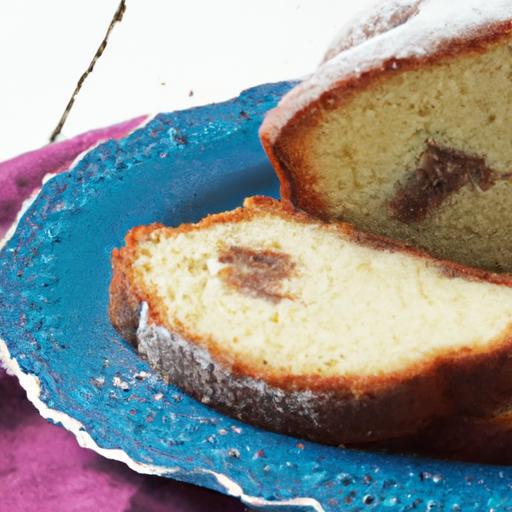
The signature marble effect comes alive when you combine two batters – traditionally vanilla and chocolate – with careful, artistic swirls. Start by spooning alternating dollops of each batter into your prepared pan, then gently trace a skewer, butter knife, or chopstick through the mixture. The key is to swirl just enough to create visually striking marbling without overmixing,which can blur the contrast and affect the final texture.
Keep in mind that even distribution of batter promotes even baking. Avoid thick clumps of one flavor in one spot, which can lead to inconsistent rise or moistness. The slow, purposeful swirling motion ensures the batter sets evenly, creating a cake that is as beautiful as it is flavorful.
Expert Tips for Enhancing Taste with Natural ingredients and Allergens in Mind
To amplify the flavor without compromising the gluten-free integrity,rely on naturally allergen-friendly ingredients like pure vanilla bean paste,high-quality cocoa powder,and fresh citrus zest. Maple syrup or honey adds gentle sweetness and moisture while keeping the cake wholesome. For a dairy-free option, substitute plant-based yogurt or coconut cream to retain richness.
Consider adding a splash of brewed espresso to the chocolate batter; this deepens the chocolate notes without overpowering the vanilla. Toasted nuts or seeds make excellent garnishes when allergies allow, but simple dustings of powdered sugar or a drizzle of dairy-free glaze keep the cake accessible to diverse diets.

Prep and Cook Time
- Readiness: 25 minutes
- Baking: 45 minutes
- Total Time: 1 hour 10 minutes
Yield
Serves 8 to 10 elegantly sliced portions, perfect for sharing at intimate gatherings or festive celebrations.
Difficulty Level
Medium: Requires attention to detail during batter preparation and swirling, but approachable with clear steps and tips.
Ingredients
- 1 cup gluten-free all-purpose flour blend, sifted
- ½ cup almond flour
- ¼ cup tapioca starch
- 1 tsp xanthan gum
- ½ cup coconut sugar or light brown sugar
- ¾ cup unsweetened almond milk (or preferred plant milk)
- ⅓ cup melted coconut oil or vegetable oil
- 3 large eggs, room temperature
- 1 ½ tsp pure vanilla extract or vanilla bean paste
- 2 tbsp unsweetened cocoa powder, sifted
- 1 tbsp brewed espresso or strong coffee (optional, for chocolate batter)
- 1 tsp baking powder (gluten-free)
- ½ tsp baking soda
- ¼ tsp fine sea salt
Instructions
- Preheat your oven to 350°F (175°C). Grease and line a 9-inch loaf pan with parchment paper, ensuring overhang for easy removal.
- Whisk together dry ingredients-gluten-free flour blend, almond flour, tapioca starch, xanthan gum, baking powder, baking soda, salt, and sugar-in a large bowl. Set aside.
- In a separate bowl, beat the eggs lightly with the almond milk, melted coconut oil, and vanilla until combined and slightly frothy.
- Gradually fold the wet ingredients into the dry mixture, stirring gently until a smooth batter forms. Avoid overmixing to prevent toughness.
- Spoon half the batter into a second bowl. Mix the cocoa powder and brewed espresso into this portion, blending well to create the chocolate batter.
- alternate spoonfuls of vanilla and chocolate batter into the prepared loaf pan, creating layers of each flavor.
- Using a skewer or knife, gently swirl through the batter in a figure-eight or circular motion. Take care not to over-swirl, preserving the distinction between batters.
- Bake for 40-45 minutes, until a toothpick inserted in the center comes out mostly clean with a few moist crumbs.
- Let the cake cool in the pan for 15 minutes before transferring it to a wire rack to cool completely. This step preserves moisture and prevents crumbling.
Tips for Success
- Use room temperature eggs and liquids to improve mixing and batter consistency.
- If your gluten-free flour blend lacks xanthan gum, add it separately to provide proper structure and elasticity.
- Don’t over-swirl your batter: gentle, deliberate movements safeguard the classic marble contrast.
- For a dairy-free version, swap out eggs for flax eggs (1 tbsp flaxseed meal + 3 tbsp water per egg) but note the texture will be slightly denser.
- Make ahead: This cake stays moist for up to 3 days at room temperature when wrapped, or freeze slices for up to 2 months.
- Adjust sweetness by substituting coconut sugar with a mild honey or pure maple syrup, adjusting liquids accordingly.
Serving Suggestions
Present this cake simply dusted with powdered sugar or drizzle a light glaze made from powdered sugar and lemon juice for brightness. fresh berries or a spoonful of coconut whipped cream complement the subtle nuttiness and deep chocolate notes perfectly.Serve it alongside a cup of spiced chai or your favorite herbal tea to elevate teatime into a memorable occasion.
| Nutrient | Per Serving (Approx.) |
|---|---|
| Calories | 210 kcal |
| Protein | 5 g |
| Carbohydrates | 26 g |
| Fat | 10 g |

For more gluten-free baking inspiration, check our Gluten-free Dessert Recipes collection and learn how to refine your oven techniques. Want to dive deeper into flour science? Visit Celiac Disease Foundation’s article on gluten-free flours for trusted expert advice.
key Takeaways
As the last crumb of your gluten-free marble cake melts away, you’ll know that indulgence need not come with compromise. Armed with these tips and twists, your baking journey transforms into a swirl of creativity and confidence-proving that gluten-free can be every bit as delightful, tender, and rich as the classic original.So go ahead, experiment with flavors and techniques, and let each slice tell a story of delicious, inclusive celebration. Because in the world of cake,every swirl is a masterpiece waiting to be savored.Happy baking!