


There’s something undeniably magical about biting into a warm, fluffy pita bread that’s risen perfectly in your own kitchen-a pocket of soft, pillowy goodness that holds a world of flavors. While store-bought options can sometimes feel lackluster or overly processed, homemade pita bread offers a fresh, satisfying experience that’s surprisingly easy to achieve. In this step-by-step guide, we’ll demystify the art of crafting perfectly puffy pita bread from scratch, sharing tips and techniques to help you create those iconic, airy pockets every time. Whether you’re a seasoned baker or a curious beginner, get ready to fill your kitchen with the irresistible aroma of freshly baked bread and transform your meals with this timeless Middle Eastern staple.
Choosing the Ideal Ingredients for Fluffy and Soft Pita Dough
Perfectly Puffy Homemade Pita Bread begins with selecting the freshest and highest quality ingredients, laying the foundation for soft, airy pockets that practically melt in your mouth.The magic starts with all-purpose flour combined with just the right amount of hydration, yeast, and a touch of sugar to activate fermentation and encourage rise. Using lukewarm water helps wake up the yeast gently, while a pinch of fine sea salt balances the flavour beautifully. For a tender crumb, a splash of olive oil adds elasticity and moisture, creating that coveted, supple texture.
Remember, the flour’s protein content is key-aim for one around 10-12%, which gives gluten enough strength to trap air pockets without toughening the bread. Avoid instant yeast and opt rather for active dry or instant yeast, which proves more reliable for a consistent puff.
Mastering the Art of Kneading and Resting for Maximum Puffiness
Once your ingredients unite, it’s time to nurture the dough by kneading it to develop gluten, the structural network responsible for the pita’s airy puff. Use a clean surface dusted lightly with flour,gently pressing and folding the dough for about 8-10 minutes. The dough should transform into a smooth, elastic ball that springs back when poked-a sign it’s ready to rest.
A crucial step follows: resting the dough. cover it with a damp towel or plastic wrap and allow it to rise in a warm, draft-free habitat until doubled in size-typically 1 to 1.5 hours.This fermentation allows yeast to produce gases that stretch the dough’s structure, ensuring those lovely, billowy pouches as the pita bakes.
Secrets to Shaping and Rolling the Perfect Pita Pocket
handling the dough gently but confidently is essential to shaping pita. Divide your risen dough into evenly sized balls-usually about 3-4 ounces each-to ensure uniform baking. Before rolling, let these balls rest briefly for 10 minutes; this relaxes the gluten, making the dough more pliable and easier to shape.
Roll each piece into a smooth round, approximately 6 inches in diameter and about ⅛ inch thick. Aim for consistent thickness to help the dough puff perfectly while baking. If the edges crack, lightly wet your fingers and smooth them out to retain moisture.
Baking Techniques That guarantee a Beautifully Puffy Pita Every Time
Heat is the pita’s best friend. Preheat your oven to its highest setting-usually 500°F or more-placing a heavy baking stone or inverted sheet pan on the middle rack to absorb and radiate intense heat. this quick burst of heat causes the water in the dough to steam rapidly, inflating the pita like a balloon.

Place each rolled pita onto the hot surface and bake for 3-4 minutes. You’ll see the dough puff dramatically, forming a pocket. Flip halfway through if your oven doesn’t cook evenly. When golden brown spots appear, your pita is perfectly baked. Remove and cover with a clean towel to keep soft and elastic as they cool.
Prep and Cook Time
- Prep Time: 15 minutes
- Rise Time: 1 hour 15 minutes
- Cook Time: 15 minutes
- Total Time: Approximately 1 hour 45 minutes
Yield
Makes 8 to 10 fluffy pita breads
Difficulty Level
Medium – Great for beginners with a bit of patience and attention to detail
Ingredients
- 3 cups all-purpose flour, sifted
- 1 cup lukewarm water (about 110°F / 43°C)
- 2 teaspoons active dry yeast
- 1 teaspoon granulated sugar
- 1 teaspoon fine sea salt
- 2 tablespoons extra virgin olive oil
Instructions
- Activate the yeast: In a small bowl, combine warm water, sugar, and yeast. Let sit 5-10 minutes until foamy to confirm yeast is active.
- Mix the dough: In a large mixing bowl, whisk together flour and salt. Make a well in the center and pour in the yeast mixture and olive oil. Stir with a wooden spoon or spatula until the dough begins to form.
- Knead: Transfer dough to a lightly floured surface and knead for 8-10 minutes. the dough should be smooth, soft, and elastic but not sticky. Add flour sparingly if too wet.
- First rise: Place dough in an oiled bowl, cover with a damp cloth or plastic wrap. Let rise in a warm place until doubled in size, about 1 to 1.5 hours.
- Divide and pre-shape: Punch down the dough gently. Divide into 8-10 equal portions and shape each into smooth balls. Let rest 10 minutes, covered.
- Roll out: On a floured surface,roll each ball into a 6-inch diameter circle,about ⅛ inch thick. Keep consistent thickness for even puff.
- Bake: Preheat oven to 500°F with a baking stone or thick baking sheet inside. Carefully transfer the rolled dough onto the hot surface. Bake for 3-4 minutes, watching for puffing and light golden spots. Flip half-way if needed.
- Keep warm and soft: Remove pita and stack,covering with a clean kitchen towel to maintain softness.
Chef’s notes and Tips for success
- Flour varieties: Experiment with bread flour for a chewier texture or blend half whole wheat for a nuttier flavor-adjust water slightly.
- Humidity matters: In dry climates, add a teaspoon of honey alongside sugar for additional moisture and yeast nourishment.
- Make-ahead: Dough can be refrigerated overnight; bring to room temp before dividing and rolling.
- Prevent sticking: Use parchment paper or lightly dust baking surface with rice flour to avoid sticking without drying dough.
- If pita doesn’t puff: Your oven may not be hot enough or dough rolled too thick-try increasing heat by 25°F and rolling thinner.
- Freezing: Baked pitas freeze well-thaw gently and reheat wrapped in foil on a hot skillet or oven.
Serving suggestions
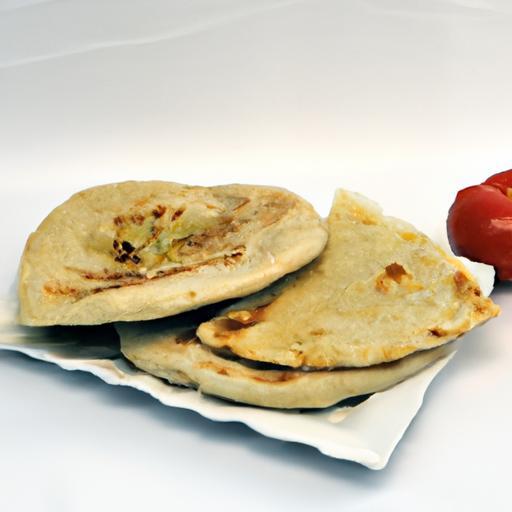
Enjoy these Perfectly Puffy Homemade Pita Bread warm from the oven, sliced open and stuffed with vibrant falafel, creamy hummus, crisp tabbouleh, or grilled vegetables. Garnish with fresh herbs like parsley or cilantro and a drizzle of tahini or zesty lemon juice for added brightness.They’re also excellent served alongside hearty stews or as the foundation for delightful wraps and sandwiches. The puffy pockets double as edible bowls, making them an inviting centerpiece for sharing meals.

nutritional Information (per pita)
| Calories | Protein | Carbs | Fat |
|---|---|---|---|
| 150 kcal | 5 g | 30 g | 3 g |
For further inspiration on homemade Middle Eastern breads, explore our detailed guide. You can also visit the King Arthur Flour website for expert insights on dough hydration and yeast techniques.
in Conclusion
There you have it-a foolproof path to pillow-soft, perfectly puffy homemade pita bread that will elevate any meal.With just a handful of simple ingredients and a bit of patience,you’ve unlocked the secret to that iconic pocket that’s ready to be filled with your favorite flavors. Whether you’re stacking them for sandwiches, dipping them into creamy hummus, or tearing them fresh from the oven, each bite is a warm reminder that homemade truly tastes better. So roll up your sleeves,preheat that oven,and watch your kitchen transform into a little pita bakery-because the best pitas are the ones made with your own hands. Happy baking!