


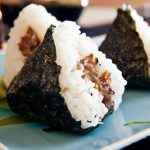

In the world of Japanese cuisine, simplicity often conceals a remarkable depth of flavor and tradition. Among its many culinary treasures, the humble onigiri-stuffed Japanese rice balls-stands out as a perfect blend of artistry, comfort, and practicality. Whether wrapped in crisp nori or adorned with a sprinkle of sesame seeds, these bite-sized delights offer far more than meets the eye. Join us as we unravel the secrets behind crafting the perfect onigiri, exploring its rich history, essential techniques, and irresistible fillings that turn everyday rice into a masterpiece of taste and texture. Welcome to your ultimate guide to the art of stuffed Japanese rice balls!
Discover the Art of Stuffed Japanese Rice Balls: onigiri Guide
Discover the art of stuffed Japanese rice balls and immerse yourself in a culinary tradition that’s been cherished for centuries. Onigiri, those perfectly shaped, portable rice delights, are much more than simple snacks-they are a lovely fusion of culture, history, and flavor. Originating as an ancient method of preserving and carrying rice during travel and battle, Onigiri has evolved into an everyday comfort food that evokes nostalgia and showcases the versatility of japanese cuisine.
The History and Cultural Significance of Onigiri
Tracing back to the Heian period (794-1185 AD), rice balls were initially hand-formed by farmers and travelers as a convenient way to pack meals. Wrapped frequently enough in nori (seaweed) or bamboo leaves, Onigiri symbolized care and connection, passed lovingly between family members or shared during seasonal festivals.
In modern times, onigiri is a ubiquitous presence in convenience stores across Japan, yet it retains a deep cultural significance. It represents simplicity, resourcefulness, and the Japanese ethos of “umami” harmony-balancing staple ingredients with delicate flavors. Whether wrapped in dark, crispy nori or stuffed with salted umeboshi (pickled plum) or savory grilled salmon, each rice ball tells a story that connects past and present.
Mastering the Perfect Rice texture for Authentic Onigiri
Creating authentic Onigiri hinges on mastering rice texture-sticky enough to hold shape, yet tender and fluffy. Use short-grain Japanese rice, rinsed well to remove excess starch, then soaked to ensure even moisture. Proper cooking with a rice cooker or heavy pot enhances the delicate glue-like consistency essential for molding.
Once cooked, let the rice cool slightly before shaping-it should be warm to the touch, never cold, as this affects adhesion. Dampening your hands with lightly salted water prevents the rice from sticking and adds subtle seasoning, deepening the savory balance.
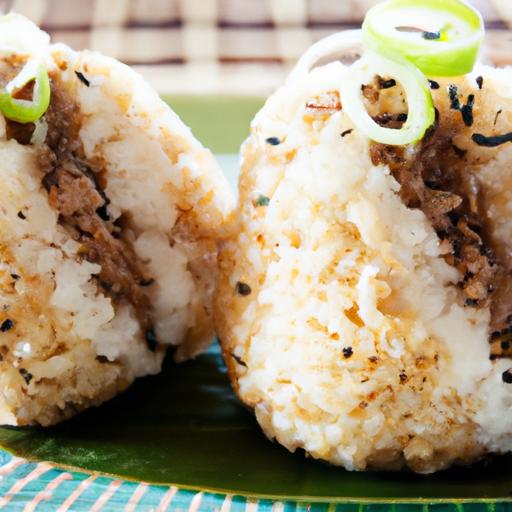
Exploring Traditional and Unique Onigiri Fillings
The magic of stuffed rice balls lies in their fillings-each bite a delightful contrast between delicate rice and intense centers.Traditional fillings include shiozake (salted salmon), umeboshi, and kombu (simmered kelp), reflecting a pantry rooted in preservation and umami depth.
For the adventurous palate, explore fillings like spicy tuna tartare, teriyaki chicken, or even vegetarian-friendly options such as miso eggplant or pickled daikon radish. These modern twists enliven the classic concept and invite you to personalize your Onigiri experience.

Tips and Techniques for Shaping and Wrapping Your Onigiri
The art of shaping is tactile and meditative. Begin by gently pressing a mound of rice in your hand, creating a slight indentation for your filling. Encase the filling, then carefully mold the rice into a snug triangle, cylinder, or ball-avoiding over-compression to preserve fluffiness.
Wrapping your Onigiri in nori is both functional and aesthetic. Sheets should be slightly crisp to add texture but pliable enough to fold without tearing. For a modern twist, consider wrapping with shiso leaves or thin cucumber strips for an extra layer of flavor and color.
Prep and Cook Time
- Preparation: 15 minutes
- Cooking: 25 minutes (rice cooking time)
- Total Time: 40 minutes
Yield
Makes approximately 8 medium-sized stuffed onigiri
Difficulty Level
Easy to Medium – Perfect for beginners with a few handy tips for precision
ingredients
- 2 cups short-grain Japanese rice,rinsed thoroughly
- 2 ½ cups water (for cooking rice)
- 1 tsp salt,plus extra for hand seasoning
- 8 sheets nori,cut into strips or halves
- 150g salted salmon flakes (or grilled salmon,skin removed)
- 100g umeboshi (pickled plum),pitted and finely chopped
- 1 tbsp toasted sesame seeds (optional)
- Pickled daikon or sliced cucumber for garnish
Instructions
- Rinse the rice under cold water until the water runs clear to remove excess starch,then soak for 30 minutes.
- Drain and add rice to the cooker with 2 ½ cups of water. Cook according to the rice cooker instructions or simmer covered on the stove for 15-18 minutes. Let steam for 10 minutes off heat.
- While rice cooks, prepare your fillings. Flake the salmon and chop umeboshi finely; set aside sesame seeds for optional garnish.
- Once rice is cooked, transfer to a wooden or plastic bowl to cool slightly. Wet your hands with salted water to prevent sticking and sprinkle your hands lightly with salt for flavor.
- Form a small handful of rice into a rough ball, flatten slightly, then press your chosen filling into the center. Surround the filling with rice and shape firmly but gently into a triangle or oval using cupped hands.
- Wrap each rice ball snugly with a strip of nori for texture and extra umami.The nori helps hold the shape and keeps the fingers clean while eating.
- Optional: Sprinkle sesame seeds on top or garnish with pickled daikon or cucumber for fresh crunch before serving.
Tips for Success
- Always use short-grain rice for optimal stickiness; avoid long-grain or jasmine rice, which won’t hold shape well.
- Control temperature: Shape rice while warm, as cold rice becomes crumbly and loses adhesion.
- Customize fillings based on availability-try canned tuna mixed with a touch of Japanese mayo for a quick alternative.
- For make-ahead,wrap formed onigiri individually in plastic wrap and refrigerate up to 24 hours. Rewarm briefly in the microwave before serving for best texture.
Serving Suggestions
Serve your stuffed rice balls on a simple bamboo leaf or elegant wooden plate to emphasize freshness and tradition. Pair with a side of miso soup or a crunchy salad of pickled vegetables. Garnish with extra sesame seeds, a sprinkle of shichimi togarashi (Japanese seven-spice), or a dab of wasabi for subtle heat. Enjoy with a classic miso soup recipe for a wholesome meal experience.

| Nutrition | Per Onigiri (approx.) |
|---|---|
| Calories | 160 kcal |
| Protein | 5g |
| Carbohydrates | 35g |
| fat | 1.2g |
To further explore Japanese culinary traditions, check out our detailed guide on making miso soup from scratch and complement your homemade Onigiri perfectly.
to sum up
As you wrap your hands around a perfectly shaped onigiri, filled with treasures from sea, land, or garden, you’re not just tasting a snack-you’re experiencing centuries of Japanese tradition folded into a simple, satisfying bite. Whether you choose to master the classic umeboshi-filled triangle or invent your own savory surprise, the art of stuffed Japanese rice balls invites endless creativity and connection. So, next time hunger strikes, remember: with just a handful of rice and a spark of inventiveness, you hold the appetizing legacy of onigiri-an edible story waiting to be written, unwrapped, and enjoyed.